Japanese plane set up - I: fitting the blade

This is an interesting Japanese plane that my wife got for me for my birthday last year from Harrelson Stanley. It’s a plane made without a chipbreaker, and it’s interesting because of the materials used to make the plane. The body of the plane was made from beech by John Reed Fox, who is known for his use of Japanese tools in his work, and who was featured demonstrating Japanese planes on an episode of The Woodwright’s Shop.

The blade was made by Muh-Tsyr Yee, a Chinese-American blacksmith, who made the hard layer from O-1 steel. Between the O-1 steel in the blade and the beech used for the body of the plane, this may be as close to a domestically sourced Japanese plane as you can get.
The plane has been sitting in my shop for about a year, and I’m finally getting around to setting it up. Setting up a Japanese plane may seem a bit like a black art, but it’s really a pretty straightforward process, and you only need a minimal amount of tools to get this done.

The first step is to sharpen up the blade. Once that’s done, the next step is to fit the blade to the mortise in the body of the plane. Here’s the set up I use for this. From left to right, there’s a bottle of camellia oil, a piece of plywood with some scrap pieces of wood attached with screws to create a stop, a mill file and some chisels, one of which needs to be thin enough to get into the side grooves of the plane body.
The blade is held in place by the bed and the side grooves of the body of the plane. Although most Japanese planes also come with a chipbreaker and a pin, neither of those pieces are needed to keep the plane blade in position. A Japanese plane blade isn’t parallel on the front and back of the blade. Instead, it has a taper, giving it a wedge shape, and the side grooves of the body of the plane have a matching taper. Because of the wedge shape and the closeness of the fit of the body of the plane to the plane blade, the blade gets firmly locked into place once it’s properly seated.
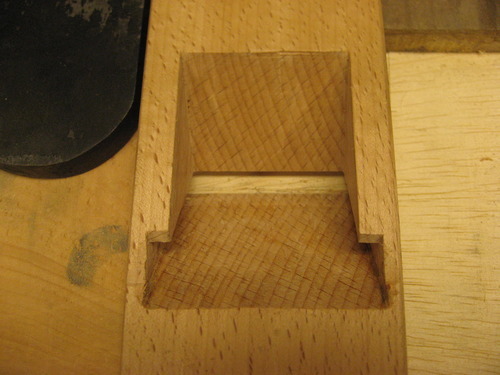
To start, use the bottle of camellia oil to coat the flat area of the bevel side of the plane blade. Then put the blade into the body, and tap it in with a mallet until it stops. When I first started, the blade was a good 3/8" from reaching the mouth.
Hit the plane on the back of the body to back the blade out. The camellia oil will leave clear marks on the bed and side grooves representing where the plane blade makes contact with the body of the plane.

You don’t have to use camellia oil on the plane blade to mark the contact points. In the past I’ve scribbled on the back of the plane blade with a pencil, a Sharpie marker, a dry erase marker, and sprinkled some graphite powder on the plane blade for this step. I’ve heard of people blackening the back of the plane blade by holding it over a candle, but have not tried this myself. Any of these methods will work.
Now that the contact points are marked, remove the wood in those areas with your favorite implement of destruction. The areas that are fair game include the bed of the plane and the sides of the grooves. The upper surface of the groove should never be touched. I use a combination of a milled-tooth file and chisels. Alternatives include a regular file or a plane float.
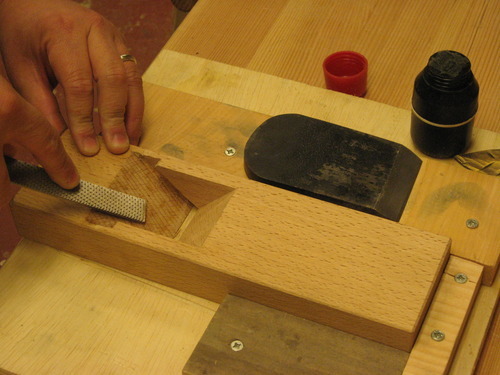
I’ll remove enough wood from these areas to the point that the oil marks nearly disappear. If the blade is replaced after doing this, it will sit a bit further towards the mouth.
Lather. Rinse. Repeat.
Good music helps this task move along. I was listening to an old Hüsker Dü album. The goal is to get the edge of the blade to within about 1/8" of the mouth with just hand pressure. At this point, it should be pretty easy to tap the blade with a mallet to bring the edge to the level of the sole of the plane.

As I had mentioned, this is a pretty straight forward procedure. If you can fit a mortise and tenon joint, you can do this. The impulse is to go too slow in removing the wood. You certainly have to slow down as you get closer to the final fit, but at the beginning stages I was pretty aggressive with the file. It doesn’t take very many cycles of fit/file/refit to get a good feel for this process. It should take 30 minutes or less to completely finish this process.
 9:28 am 22 Oct 2010